Not what you're looking for?
Head back to the guide overview on the getting started page.
¶ Introduction
The main purpose of this guide is to be an overview of what features are available and what they're used for.
The profile system is one of the main features of Artemis and is what allows you to create extremely customizable effects on all your supported devices. Profiles are closely tied to modules, this means each profile you create is a profile for a module. You can create multiple profiles and switch between them at will as long as the module is active.
Since all changes to profiles are made using the profile editor, every profile feature is shown through the editor. However, this guide won't go into deep detail of each individual feature, instead links to more specific guides will be included where relevant.
To access the profile editor of a module, simply select the module in the sidebar.
¶ Profile contents
A profile contains your layers and folders, it is basically Artemis's way of storing your savedata.
Profiles conform to a hierarchy as shown below:
- Folders - Your profile can contain as many folders as you want
- Folders may contain other folders and layers, nesting the hierarchy
- Layers - Your profile can contain as many layers as you want
- Properties - Each layer has its own set of properties
- Keyframes - Keyframes allow you to change the values of properties over time
- Data bindings - Data bindings allow you to bind the values of properties to data such as CPU usage, health bars etc.
- Brush - A layer uses a brush to determine what should be shown
- Brush properties - Each brush has its own set of properties
- Effects - A layer can use effects to modify what should be shown
- Effect properties - Each effect has its own set of properties
- Conditions - Conditions allow you to show/hide layers when specific criteria are met.
- Properties - Each layer has its own set of properties
¶ The editor
The profile editor is accessed by selecting a module in the sidebar, you'll be in the profile editor for that specific module.
Once you open the profile editor regular profile playback stops, all other modules are suspended and the editor takes over.
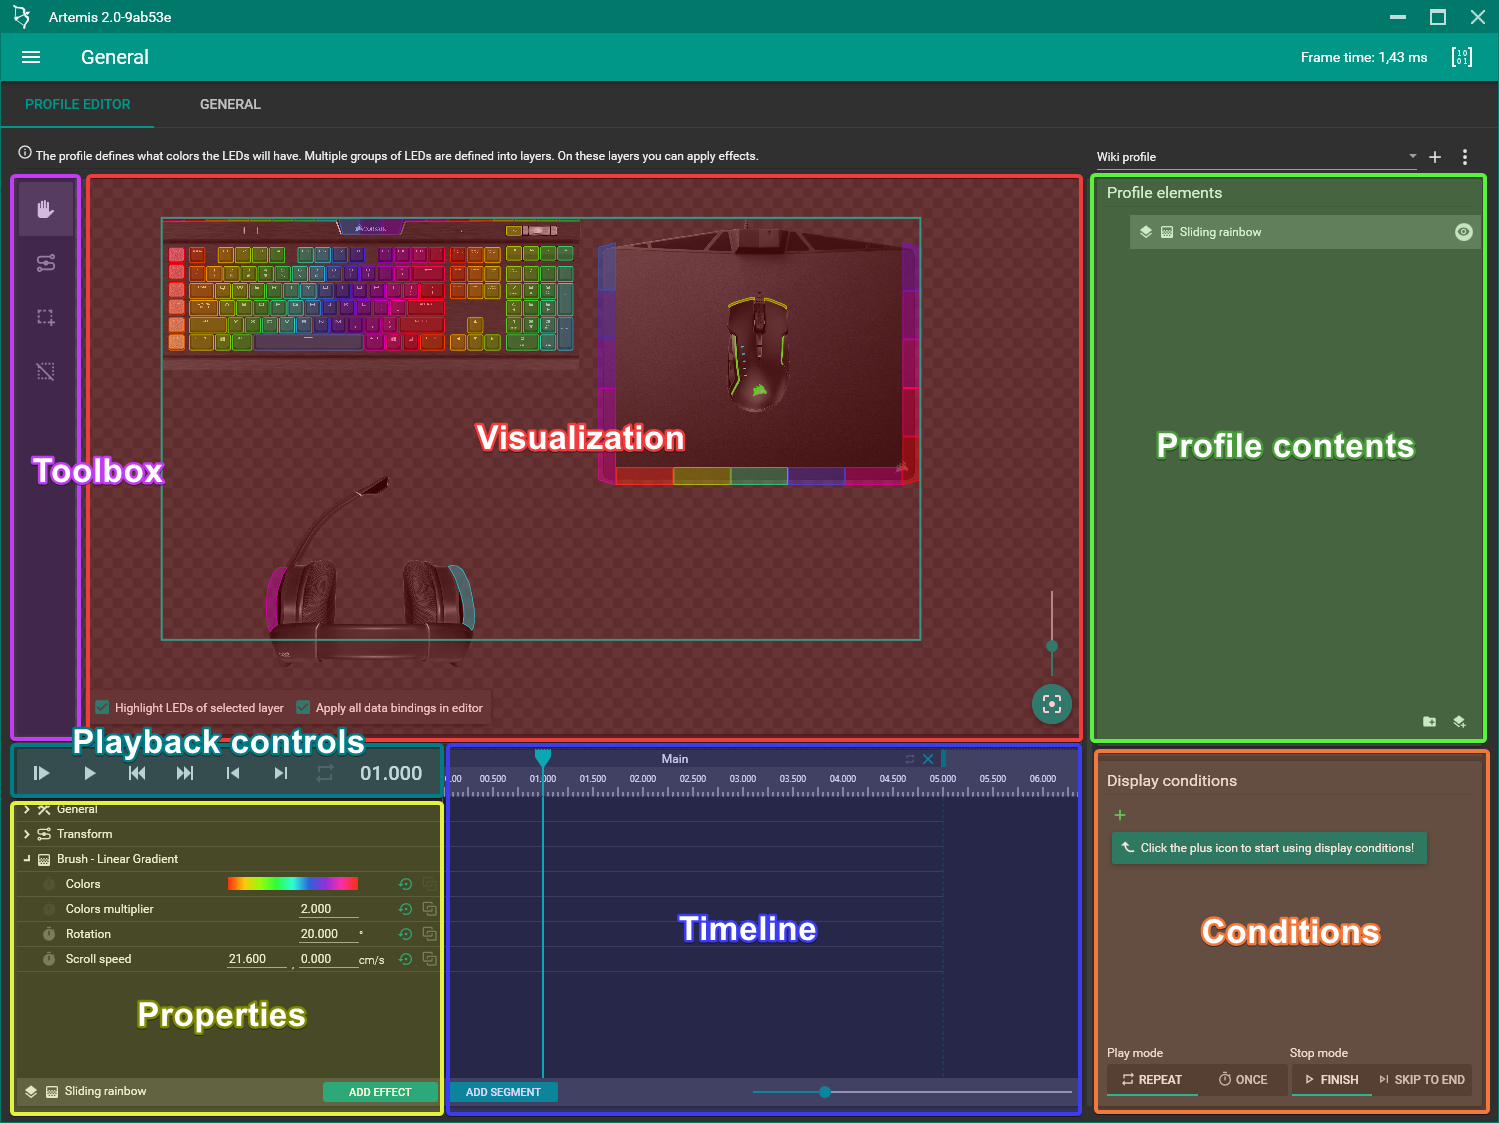
The image below highlights each aspect of the profile editor. In the next chapters each highlighted part of the editor is explained.
¶ Toolbox
The toolbox contains all the tools you can use to modify layers in de visualization panel on the right.
The tools available to you are:
- Panning tool - Use this to pan around the profile, you can quickly access this by holding down Ctrl.
- Transform tool - Use this to transform the shape of the currently selected layer.
- LED selection tool - Use this to change the LEDs of the currently selected layer.
- LED removal tool - Use this to remove LEDs from the currently selected layer.
More detailed info on using these tools can be found in the layer guide.
¶ Visualization
The visualization part of the editor is used to see what's going on in real-time. Assuming your devices have a layout, you'll see a realistic representation of your device with all its LEDs.
You can use the Panning tool to move around the surface (holding down Ctrl will select the panning tool until you release it again). To get a closer look you can use the mousewheel to zoom in and out.
The visualizer shows all the layers of your profile but only LEDs and shape of the currently selected layer are highlighted.
Below is an example of 3 layers - all on the keyboard - but with shapes that cover only part of the keyboard:
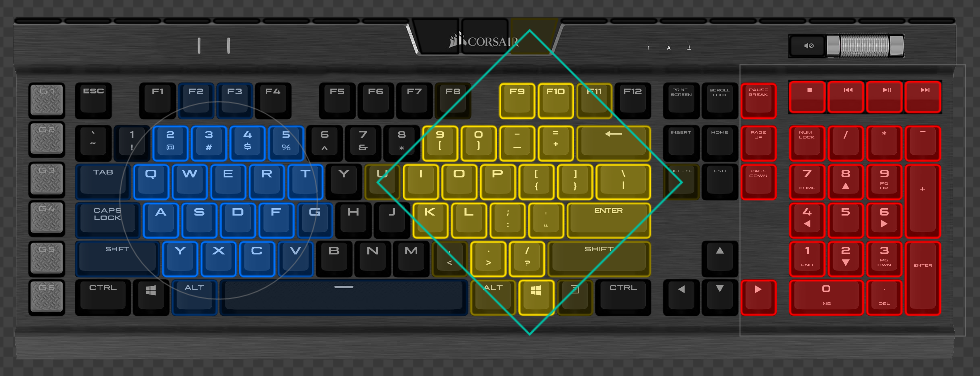
How layers and their shapes exactly work is discussed in the layers guide.
¶ Profile elements
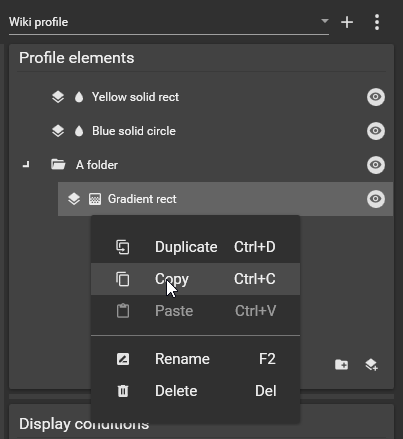 Just above the panel you can manage your profiles for this module such as adding new ones, switching profiles, renaming etc.. The profile elements panel itself contains all the layers and folders of your profile.
Each element contains an icon indicating its type, a or for folders and a for layers.
For layers another icon is visible which is the brush icon. This icon helps you to more easily identify layers, hovering over this icon will also tell you the name of the brush.
You can use the -toggle to temporarily disable layers and even entire folders.
The main purpose of this panel is to manage the contents of the profile
- Click either the -icon or the -icon to add a new element to the profile root.
- Right-click a folder to open a context menu allowing you to add a new element.
- Copy/paste an existing element by right-clicking it or using Ctrl + V and Ctrl + C.
- You can change the order of elements by dragging them around.
- You can also move existing elements into a folder by dragging that element into the folder.
- Right-clicking any element will give you even more options like renaming, deleting etc.
¶ Playback controls
It is vital to understand that these controls are only for the profile editor. Nothing you click here effects regular profile playback in any way.
 To get a sense of how your profile will look when the editor is closed, you can use the playback controls to start a preview.
- Play from start - Previews the current layer from the start. - Shift + Space
- / Play/pause - Play or pause the current preview. - Space
- Go to start - Moves the timeline cursor to the start of the layer.
- Go to end - Moves the timeline cursor to the end of the layer.
- Previous frame - Moves the timeline cursor back one frame.
- Next frame - Moves the timeline cursor forwards one frame.
- / Repeat - Toggles repeating the current layer (if set to ) or the current segment (if set to ) during preview.
- To learn about repeat modes for layers during regular profile playback, see the timeline guide and more specifically the segments guide.
- 00.350 - The current position on the timeline.
¶ Properties & effects
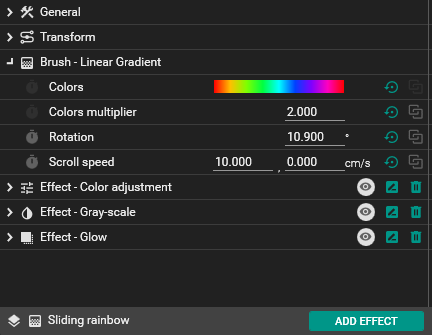 When you select a layer in the profile elements panel, its properties become visible in the properties panel.
Because this guide is meant as an overview, we won't go into detail here but the main takeaway is that this is where you change all the settings for your layer.
In a new layer all settings are collapsed, you may expand them by clicking the -icon. Once you've done that you'll be shown all the settings within that category.
By default a layer has 3 main categories
- General - The most important property here is the Brush type. This determines what is actually shown in your layer.
- Transform - These properties all allow you to change the shape of your layer. You can also manipulate these properties using the transform tool.
- Brush - The third category contains all the properties of the brush you selected under general. These properties are different for every brush.
Already want to learn a bit more? Hover over the properties in Artemis to view a more detailed description of what they do!
Below the properties you can see the name of the currently selected layer and next to that there's an ADD EFFECT button. Clicking this button will allow you to add an effect to the layer.
A layer can use effects to modify what should be shown, this can be adding a glow, adjusting the color, making the layer grayscale etc.
You can have multiple effects but they are always applied in order.
Because when stacking effects the order can make a difference, you can reorder effects by dragging them up and down.

Each effect has its own property group but they are slightly different from the 3 main categories
- The -toggle is used to temporarily disable effects.
- The -icon lets you rename an effect (this is useful if you have per example multiple color corrections)
- The -icon lets you delete an effect.
For more info on properties and effects, please refer to the layers guide.
¶ Timeline
The main purpose of the timeline is to create custom animations using keyframes.
The timeline allows you to change the value of one or more properties over time. The way this is done is by giving a property multiple values at different points in time, these values are called keyframes. When the timeline plays Artemis smoothly follows these keyframes, resulting in an animation.
The timeline is split up into separate rails. Each property has its own rail and on these rails you can place keyframes. Because of this, you'll be using the properties panel and the timelines panel together a lot.

In the image above you'll see that keyframes are enabled for the Position, Scale and Rotation properties. This was achieved by clicking the -icon in front of each property.
Each keyframe is shown on the timeline using circle like this one: .
You can drag these around to change their position. The position of your keyframes determine the start, end and speed of the animation.
Changing the value of a property which has keyframes enabled adds a new keyframe at the current position of the timeline cursor.
Collapsing a property will also collapse the rails, causing all keyframes to be consolidated into a single rail which you cannot edit.

To learn about the timeline and keyframes, see the timeline guide and more specifically the keyframes guide.
¶ Conditions
In Artemis you can use conditions to make layers and even entire folders hide/display when certain criteria are met.
Conditions are created using visual programming, this means all you need to do is click things!
Below is an example of a condition using groups and different operators.
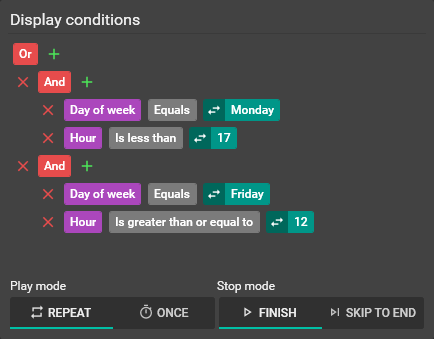
Conditions are color coded and can be devided into several parts
- Red is the boolean operator (and, or, and not, or not)
- Purple is the left side of the condition (any data model value)
- Gray is the comparison operator (equals, does not equal, is greater than etc.)
- Teal is the right side of the condition (any data model value or your own input)
Since the right side of the condition can be a data model value or your own input, you can swap between the two modes by clicking the -icon.
In full human language the condition from the image above looks like this:
The day of the week is monday and the current hour is before 17:00 or The day of the week is friday and the current hour is or is later than 12:00
Below the conditions you'll find two configuration options, the Play mode and the Stop mode.
These allow you to configure how your layer should act while its conditions are met and when conditions stop being met.
Play mode - Configure how the layer should act while the conditions are met
- Repeat - Continue repeating the timeline while the condition is met.
- Once - Only play the timeline once when the condition is met.
Want your layer to repeat, even while you have no conditions? Make sure play mode is set to Repeat.
Stop mode - Configure how the layer should act when the conditions are no longer met
- Finish - Finish the the current run of the timeline when the conditions are no longer met.
- Skip to end - Skip to the end of the timeline when the conditions are no longer met.
More details on conditions, different condition types and more can be found in the conditions guide.
¶ Data bindings
One last powerful feature of the editor are data bindings. Where conditions allow you to show/hide things based on certain criteria, data bindings allow you to tie properties to values.
To show the difference we have two examples
- Conditions: Show a red blinking layer when you are low health, creating a health alert.
- Data bindings: Bind the width of a layer to your current health percentage, creating a health bar.